Next we create a mail merge report in Word. First we look at creating a report where only one .csv file is generated.
In this example, we use the main .csv file (eloans.csv). In the majority of cases in which only a single .csv file is generated when a report is run out of EMu, the steps described here are all you will require to create a mail merge report. At this stage the report will include details about the loan and the borrower (but not the objects loaned).
Note: The steps described here for connecting to the DSN are required whether you have one or more than one .csv file to access.
We will then adapt out report to access data included in the second .csv file (ObjObjec.csv) in order to include details about the objects loaned.
Microsoft Word opened when we ran the new report at the end of Step 1: Create the report in EMu.
In order to run the macros we will create we need to ensure that the Security level in Word is appropriate:
- Select Tools>Macro>Visual Basic Editor (
ALT+F11) from the Menu bar.The Microsoft Visual Basic editor opens.
- Select Tools>References from the Microsoft Visual Basic Editor Menu bar.
The References - Project dialogue box displays.
- Place a tick in the Microsoft Activex Data Objects 2.7 Library check box and click OK to close the dialogue box.
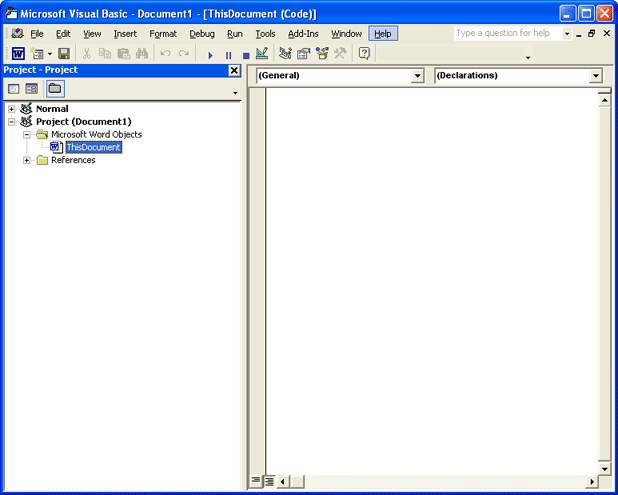
- Under the Project (Document 1) folder in the left Project pane, double-click ThisDocument :
- First we set up the data source:
Select Document from the first drop list and Open from the second drop list.
- Enter the following code between Private Sub Document_Open() and End Sub :
'' Setup the data source and run the merge
'Set MainDocument = ActiveDocumentWith ActiveDocument.MailMerge.MainDocumentType = wdFormLetters#If Win64 Then.OpenDataSource _Name:="", _connection:="DSN=EMu Loans x64;", _SQLStatement:="SELECT * FROM eloans.csv", _SubType:=wdMergeSubTypeWord2000#Else.OpenDataSource _Name:="", _connection:="DSN=EMu Loans;", _SQLStatement:="SELECT * FROM eloans.csv", _SubType:=wdMergeSubTypeWord2000#End If.Destination = wdSendToNewDocument.Execute Pause:=FalseEnd With'' Force all fields to be updated in case we have images
'ActiveDocument.Fields.UpdateMainDocument.Close SaveChanges:=FalseNote: See DSN table for details about EMu DSN names and the name of the .csv files generated.
- Select Close from the second drop list.
- Enter the following code between Private Sub Document_Close() and End Sub :
' When the document is closed we need to disconnect the
' data source otherwise Word will try and use it
' when opening the document
ActiveDocument.MailMerge.MainDocumentType = wdNotAMergeDocument
ActiveDocument.Save
Note: While we're building our report we want to comment out the following line:
MainDocument.Close SaveChanges:=False
We do this by placing an apostrophe at the start of the line of code (as in the previous screenshot).
If this line is not commented out, the master report document we are creating will not display when the report is run.
We will need to remove this apostrophe after we have finished creating the report. Explanation of the macros
Note: It is beyond the scope of this Help to explain the Visual Basic code (or how to program with Visual basic) in detail, and the following is provided for general information only.
- The function Document_Open() is executed every time the document is opened in Word.
- The line With ActiveDocument.MailMerge
specifies that all lines that start with a dot (.) down to the closing End With statement actually have ActiveDocument.MailMerge prepended to them.
- The merge document type is set with:
.MainDocumentType = wdFormLetters
There are many document types available which define how the merged document will appear. The value wdFormLetters indicates that we are producing a separate letter (page) for each merge record found. For a complete list of values available consult the Help system within the Visual Basic Editor (search using the keyword MainDocumentType).
Ensures that 64bit DSNs are used when a user has a 64bit version of Office installed; otherwise 32bit DSNs are used:
#If Win64 Then...- The following lines set the DSN without specifying the location of the database files:
.OpenDataSource _Name:="", _connection:="DSN=EMu Loans x64;", _SQLStatement:="SELECT * FROM eloans.csv", _SubType:=wdMergeSubTypeWord2000Lines ending with an underscore (_) indicate that the code continues on to the next line. The above lines are actually a single code statement. As you can see the name of the DSN is set in the Connection property (the value is EMu Loans). If we were using data from the Parties module rather than the Loans module, we would need to change the DSN from EMu Loans to EMu Parties.
Note: The DSN table can be used to determine the name of the DSN to use for each module.
The SQLStatement defines a query that is used to retrieve the records required from the data source. The query SELECT * FROM eloans.csv fetches all the records from the Loans data source.
The Subtype property is required for Word 2002 onwards.
Note: If your institution uses an earlier version of Word, remove this line and the comma and underscore at the end of the previous line.
If you are using Word 2000 or earlier, it may be necessary to add at least one field to the Word document before the macro will work (otherwise an error 4605 may be generated). - The next line of code indicates the destination of the resulting merge document:
.Destination = wdSendToNewDocument
The value wdSendToNewDocument sends the output to a new Word document. Consult the Help system within the Visual Basic Editor (search using the keyword Destination) for a complete list of possible destinations.
- Now that the merge document type, data source and output destination are defined we can run the mail merge to produce the required document. The line:
.Execute Pause:=False
runs the mail merge, placing any error messages in the new document. When the merge is executing you will see two Word documents on your screen. The first document will be the master merge document (the one we are creating) and the second will be the new output document.
- Once the merge is complete we force an update of all fields in the merged documents with the code:
ActiveDocument.Fields.Update
This line is only required if you have exported images from EMu via the report interface for inclusion in a report. If this is not the case, you can remove this line.
- Finally we close the master mail merge document:
MainDocument.Close SaveChanges:=False
which will leave the new mail merge document as the only open document. While building a report it is useful to disable this statement so that you can test your mail merge document. If it is not disabled, a mail merge will be run every time we open the document (which is good), but we will not be able to get to the master merge document as it will be closed (which is bad). To disable the statement, place an apostrophe at the beginning of the line. We will remove the apostrophe after we have completed the report (see also Step 3: Edit the VB code to close the main report document).
- The second function, Document_Close(), is executed when the document is closed. The code is used to save the document without its mail merge status. If a document is deemed to be a mail merge document, Word will automatically store the file location of the data source that is currently being used. As storing this location will make our report malfunction on different machines (since the file location may vary from machine to machine) we need to save the document as a "normal" Word document. The following lines of code reset the document type and save the document again:
ActiveDocument.MailMerge.MainDocumentType = wdNotAMergeDocument
ActiveDocument.Save
- Select File>Close and Return to Microsoft Word from the Visual Basic editor Menu bar.
The Visual Basic editor closes.
- Save the Word document with a descriptive name, e.g. LoanAgreement.doc.
- Close the Word document.
Next we test that the data source code has been configured correctly.
The code added in 1. Write the VB code ensures that when the Word document is opened the data source is configured correctly without embedding the location of the DSN. We need to test that the data source code has been configured correctly:
- Open the main report document, e.g. LoanAgreement.doc in this example.
The Security box displays:
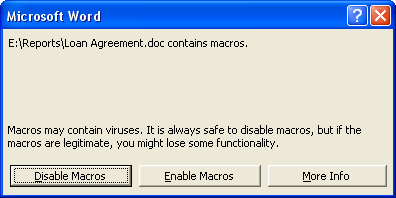
- Click Enable Macros.
- Two documents open:
- The main report document, e.g. LoanAgreement.doc.
- A mail merge document (e.g. FormLetters1.doc) generated by the macros in the main report document. This document is blank because no text has yet been added to the main report document.
Note: If this doesn't happen and a dialogue box opens looking to establish a connection to a data source, ensure that you commented out MainDocument.Close SaveChanges:=False at Step 9.
- Close FormLetters1.doc without saving it.
- Select View>Tool bars>Mail Merge to display the mail merge Tool bar:

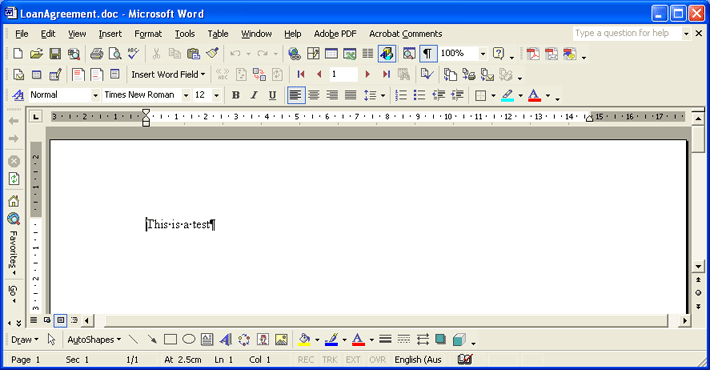
- Add some test text to the LoanAgreement.doc document, e.g. This is a test:
- Save and close the main report document.
- Reopen the main report document, enabling macros when asked.
A new mail merge document (e.g. FormLetters1.doc
)should be generated displaying the test text, indicating that the data source code is working correctly. - Delete the test text from the main report document, e.g. LoanAgreement.doc, save and close the document.
- Close the mail merge document (e.g. FormLetters1.doc) without saving it.
Next we add text to the main report document.
- Open the main report document report, e.g. LoanAgreement.doc in this example.
The Security box displays:

- Click Enable Macros.
- Two documents open:
- The main report document, e.g. LoanAgreement.doc.
- A mail merge document, e.g. FormLetters1.doc.
- Close the mail merge document without saving it.
In the main report document we'll add an automatic date to the top of the document.
- Select Insert>Date and Time from the Microsoft Word Menu bar to display the Date and Time box.
- Select the required date format and ensure that the Update Automatically checkbox is ticked:
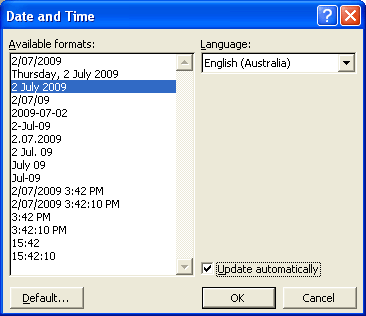
The current date will display on the page (and will be updated daily).
Note: If you select Tools>Options from the Menu bar and then place a tick in the Field codes check box on the View tab, the code for this date field will display. Alternatively, use the keyboard shortcut
ALT+F9to hide / display field codes. - Below the date, enter text into the document. For example:
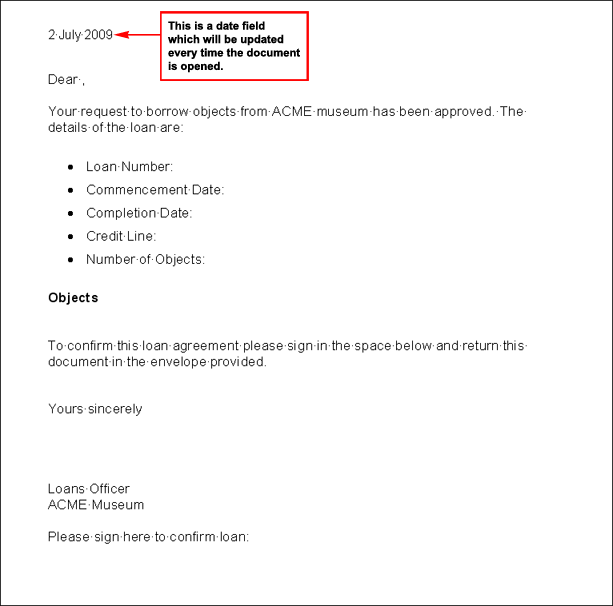
- Save and close the main report document.
- Reopen the main report document, enabling macros when asked.
Again two documents are opened, the main report document (e.g. LoanAgreement.doc) and the mail merge document (e.g. FormLetters1).
The mail merge document now includes the text and date that were added to the main report document.
- Close the mail merge document (e.g. FormLetters1) without saving it.
Next we add fields to the main report document.
In the main report document (LoanAgreement.doc in this example):
- Press
ALT+F9.The document is now in Show Field Codes mode and the date field entered in the previous step should now display as code rather than a date.
- Place the cursor in the document where you want to insert a field, e.g. one space after Loan Number in this example:
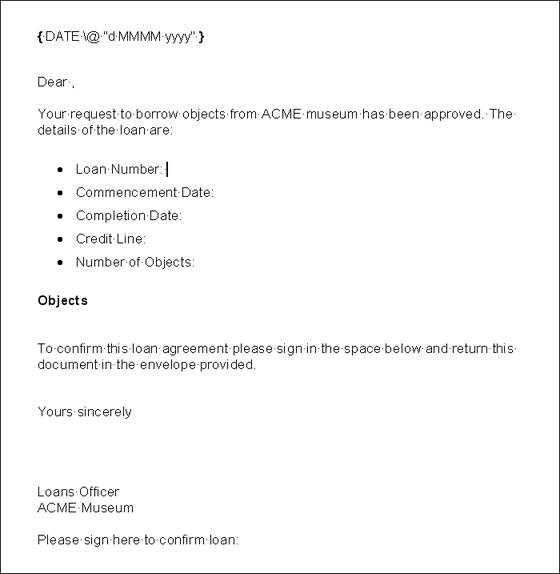
- Click Insert Merge Fields
 from the Mail Merge Tool bar.
Note: If the Mail Merge Tool bar does not display, select Tools>Letters and Mailings>Show Mail Merge Tool bar from the Microsoft Word Menu bar.
The Insert Merge Field box displays:
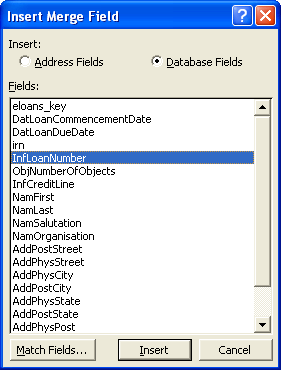
Note: If a field you added to the report in EMu does not display in the Insert Merge Field box, it is probable that the field is a table of values and has been output as a separate .csv. If you wish to include it in the report, it is necessary to convert the field in EMu from Table to Text (see 1: Create the report in EMu for details) or to add additional Visual Basic code to access data in the second (third, etc.) .csv file.
- Select the field to insert, e.g. InfLoanNumber in this example, and click Insert
-OR-
Double click the field to insert.
- Close the Insert Merge Field box.
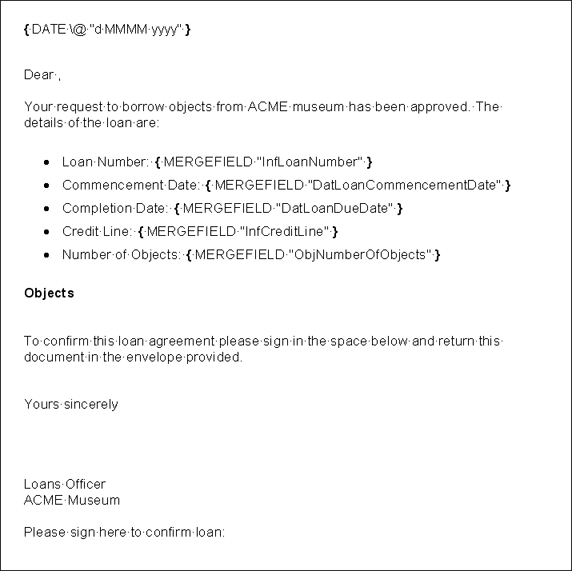
In this example the following field code displays where the cursor had been placed:
Loan Number: { MERGEFIELD "InfLoanNumber"}
- Add the remaining fields to the main report document.
Note: To find the correct field name to select, open the module in which the report was created, move to the field and press
F1. The EMu Field Level help opens, displaying the field name. - The main report document now displays a number of inserted field codes:
Tip: Each field can be assigned a number of display and functional properties, e.g. to display in UPPERCASE; to add text either before or after the field value, etc.
 To set field properties:
- In the main report document, right-click a field (e.g. InfCreditLine) and select Edit Field from the menu that displays:
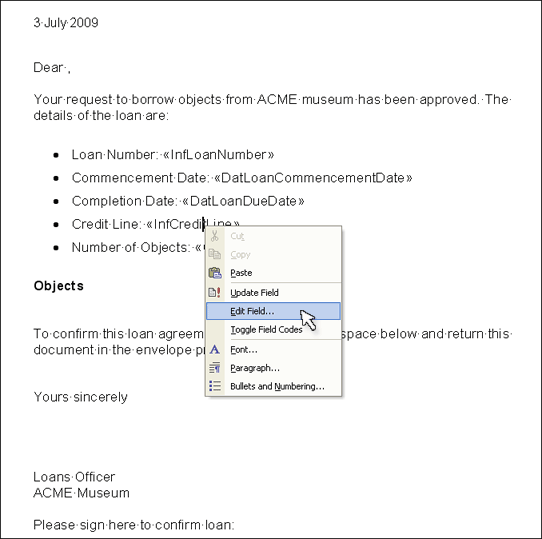
The Field box displays.
- Select the required format for the field in the Format list, e.g. Uppercase:
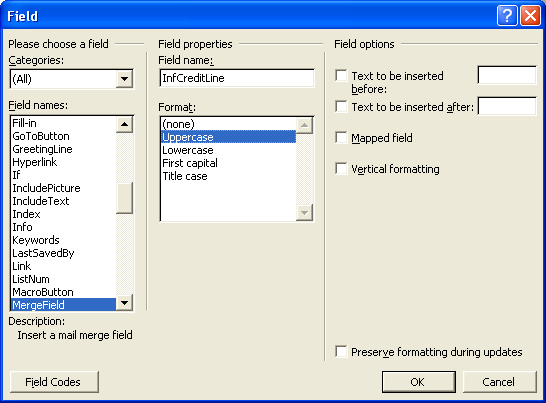
- Click OK.
- Save and close the main report document.
- Reopen the report document, enabling macros when asked:
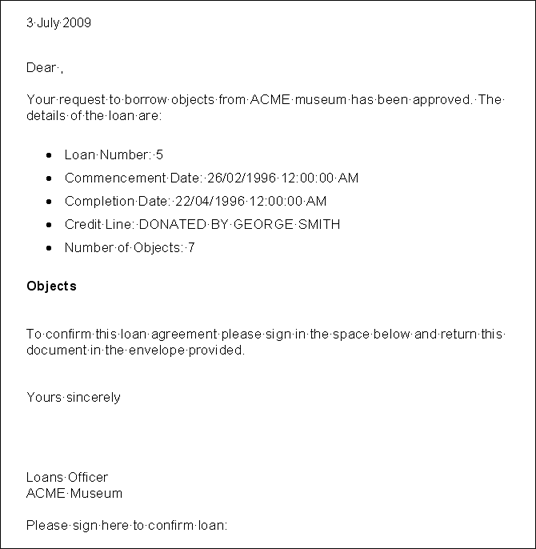
- Close both documents without saving them.
- In the main report document, right-click a field (e.g. InfCreditLine) and select Edit Field from the menu that displays:
- Save and close the main report document.
- Reopen the main report document, enabling macros when asked.
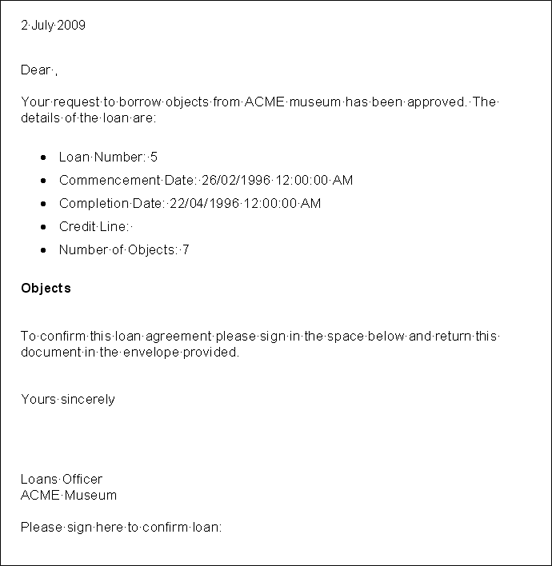
Again two documents are opened, the main report document and the mail merge document.
Note: You may need to select
ALT+F9(hide / display Field Codes) in order to display the date correctly.The mail merge document includes the text and data that was added to the main report document:
- Close both documents without saving them.
Next we add the Parties fields to the main report document. The Parties fields are used to:
- Insert a suitable salutation after the greeting.
- Add a mailing address.
The logic used for the salutation is:
- Enter the salutation if it exists in the Parties record.
- If the salutation does not exist, use the first name.
- If the first name does not exist, use the text Sir/Madam.
This is achieved using the If...Then...Else field code.
To insert a salutation in the main report document:
- Open the main report document (LoanAgreement.doc in this example), enabling macros when asked.
- In the main report document, select
ALT+F9to display field codes. - Place the cursor just before the comma after the Dear text (leaving a space between the text and the comma):

- Select Insert Word Field from the Mail Merge Tool bar and select If...Then...Else... from the drop list that displays:
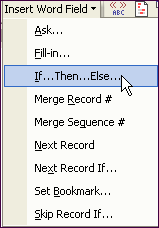
Note: If the Mail Merge Tool bar does not display, select Tools>Letters and Mailings>Show Mail Merge Tool bar from the MS Word Menu bar.
The Insert Word Field: IF box displays:
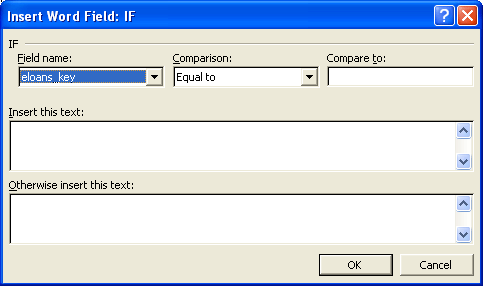
- Select NamSalutation from the Field name drop list.
- Select Not equal to from the Comparison drop list.
- Leave the Compare to field empty.
- Enter true in the Insert this text box and false in the Otherwise insert this text box:
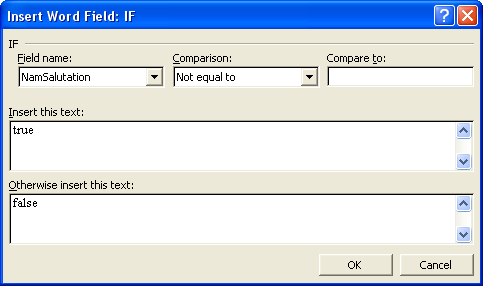
- Click OK to close the Insert Word Field box.
The following code displays in the main report document:

- Select true, making sure not to include the double quotes:

- Click Insert Merge Fields
 in the Mail Merge Tool bar and select NamSalutation from the Insert Merge Field box:
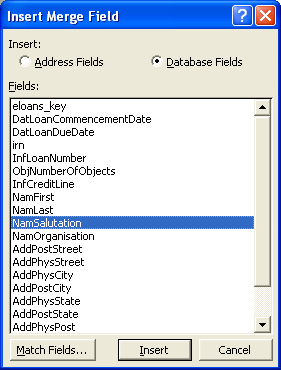
- Click Insert and then close the Insert Merge Field box.
The following code now displays in the main report document:

- Select false, making sure not to include the double quotes.
- Select Insert Word Field from the Mail Merge Tool bar and select If...Then...Else... from the drop list that displays.
The Insert Word Field: IF box displays.
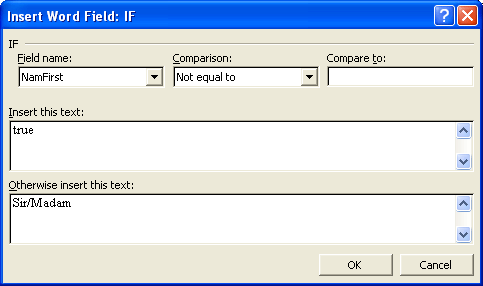
- Select NamFirst from the Field name drop list.
- Select Not Equal To from the Comparison drop list.
- Leave the Compare to field empty.
- Enter true in the Insert this text box and Sir/Madam in the Otherwise insert this text box:
- Click OK to close the Insert Word Field box.
- Select true, making sure not to include the double quotes:

- Click Insert Merge Fields
 from the Mail Merge Tool bar, select NamFirst from the Insert Merge Field box.
 - Select Insert and close the Insert Merge Field box.
The following code now displays in the main report document:

- Make sure that the font of this code matches the font of the other text in your document.
- Save and close the main report document.
- Reopen the main report document, enabling macros when asked.
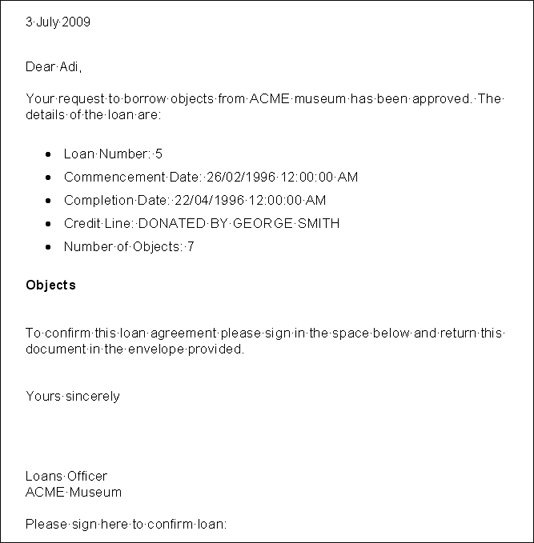
A new document is generated showing the salutation:
Next we insert name, position, department and organization details in the main report document.
The logic used here is similar to that used for the salutation. For example:
- Enter the position name if it exists.
- If the position name does not exist, leave blank.
Again this is achieved using the If...Then...Else field code.
To insert position, department and organization details in the main report document:
- Place the cursor in an area near the top of the document (e.g. after the date field) where the address details are to display:

First we'll insert the name.
- Select Insert Word Field from the Mail Merge Tool bar and select If...Then...Else... from the drop list that displays:

Note: If the Mail Merge Tool bar does not display, select Tools>Letters and Mailings>Show Mail Merge Tool bar from the Microsoft Word Menu bar.
The Insert Word Field: IF box displays.
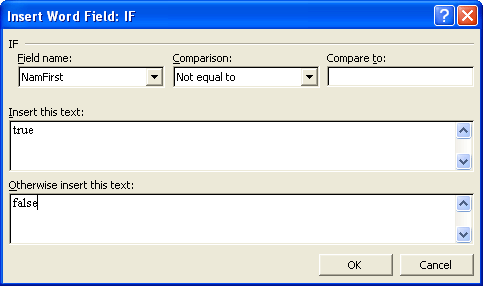
- Select NamFirst from the Field name drop list.
- Select Not equal to from the Comparison drop list.
- Leave the Compare to field empty.
- Enter true in the Insert this text box and false in the Otherwise insert this text box:
- Click OK to close the Insert Word Field box.
The following code displays in the main report document:

- Place the cursor immediately after
{MERGEFIELD NamFirst}and enter a space. - Click Insert Merge Fields
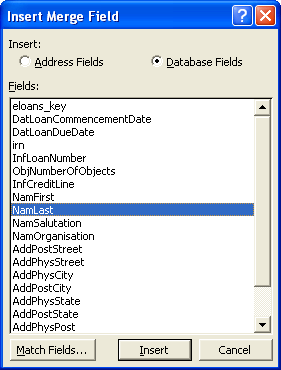
 in the Mail Merge Tool bar and select NamLast from the Insert Merge Field box:
- Click Insert and then close the Insert Merge Field box.
- Place double quotes around
{MERGEFIELD NamFirst} {MERGEFIELD NamLast}The following code now displays in the main report document:

- Select true, making sure not to include the double quotes:

- Click Insert Merge Fields
 in the Mail Merge Tool bar, select NamFirst from the Insert Merge Field box and close the Insert Merge Field box.
The cursor should be between the } and " immediately after "NamFirst":

- Hit the SPACE bar to enter a space between } and
". - Click Insert Merge Fields
 in the Mail Merge Tool bar, select NamLast from the Insert Merge Field box and close the Insert Merge Field box.
The following code now displays in the main report document:

- In order to avoid a blank line displaying if the value following the name does not exist, a soft return is placed within the code:
Place the cursor between } and " "false"}:

- Press SHIFT+ENTER to create a new line within the code.
The following code now displays in the main report document:

If both the first name and last name do not exist, nothing should be printed, therefore:
- Select false, making sure not to include the double quotes and delete it.
The following code now displays in the main report document:

This code looks to see if both the first and last fields together are empty. If either the first name or last name or both exist they will be printed, otherwise nothing will be printed.
- Next we insert the addressee's position.
To ensure that there is no blank line before the next line of the address, place the cursor on the same line and directly after the previous code.
- Select Insert Word Field from the Mail Merge Tool bar and select If...Then...Else... from the drop list that displays.
The Insert Word Field: IF box displays.
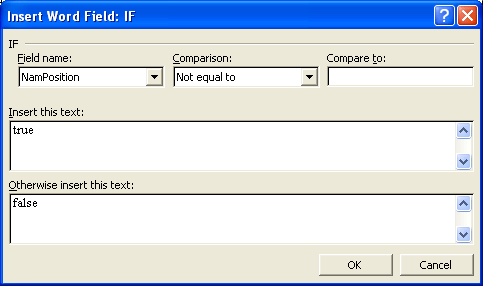
- Select NamPosition from the Field name drop list.
- Select Not equal to from the Comparison drop list.
- Leave the Compare to field empty.
- Enter true in the Insert this text box and false in the Otherwise insert this text box:
- Click OK to close the Insert Word Field box.
- Select true, making sure not to include the double quotes:

- Click Insert Merge Fields
 in the Mail Merge Tool bar, select NamPosition from the Insert Merge Field box and close the Insert Merge Field box.
 - The cursor should be between the } and " "false"}. Press SHIFT+ENTER to create a soft return.
- Select false, making sure not to include the double quotes and delete it.
The following code now displays in the main report document:

- Repeat Steps 19 onwards to insert the department (NamDepartment) and organization (NamOrganisation) fields.
The following code now displays in the main report document:

- Make sure that the font of this code matches the font of the other text in your document.
- Save and close the main report document.
- Reopen the main report document, enabling macros when asked.
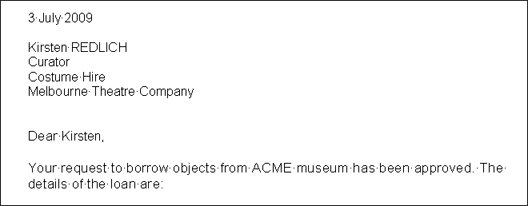
A new document is generated showing addressee details:
Finally we insert address details in the main report document.
The logic used for the address fields is:
- Enter the postal street name if it exists.
- If the postal street name does not exist, enter the physical street name.
- If the physical street name does not exist, leave blank.
Again this is achieved using the Word If...Then...Else field code.
To insert an address field in the main report document:
- Place the cursor just after the last bracket:

- Select Insert Word Field from the Mail Merge Tool bar and select If...Then...Else... from the drop list that displays:

Note: If the Mail Merge Tool bar does not display, select Tools>Letters and Mailings>Show Mail Merge Tool bar from the Microsoft Word Menu bar.
The Insert Word Field: IF box displays.
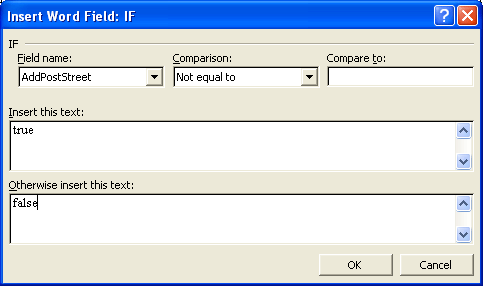
- Select AddPostStreet from the Field name drop list.
- Select Not equal to from the Comparison drop list.
- Leave the Compare to field empty.
- Enter true in the Insert this text box and false in the Otherwise insert this text box:
- Click OK to close the Insert Word Field box.
- Select true, making sure not to include the double quotes:

- Click Insert Merge Fields
 in the Mail Merge Tool bar, select AddPostStreet from the Insert Merge Field box and close the Insert Merge Field box.
The cursor should be between the } and " "false":

- Press SHIFT+ENTER to create a new line within the code.
- Select false, making sure not to include the double quotes:

- Select Insert Word Field from the Mail Merge Tool bar and select If...Then...Else... from the drop list that displays.
The Insert Word Field: IF box displays.
- Select AddPhysStreet from the Field name drop list.
- Select Not equal to from the Comparison drop list.
- Leave the Compare to field empty.
- Enter true in the Insert this text box and false in the Otherwise insert this text box.
- Click OK to close the Insert Word Field box.
- Select true, making sure not to include the double quotes:

- Click Insert Merge Fields
 in the Mail Merge Tool bar, select AddPhysStreet from the Insert Merge Field box and close the Insert Merge Field box.
The cursor should be between the } and " "false"}.
- Press SHIFT+ENTER to create a soft return.
- Select false, making sure not to include the double quotes and delete it.
The following code now displays in the main report document:

- Repeat Steps 1 onwards to add the:
- Postal/physical state (AddPostCity/AddPhysCity)
Instead of using a soft return (
SHIFT+ENTER) leave three blank spaces after the AddPostCity and Add PhysCity field codes so that the postcode will display three spaces after the city name. - Postal/physical postcodes (AddPostPost/AddPhysPost)
The following code now displays in the main report document:

- Postal/physical state (AddPostCity/AddPhysCity)
- Make sure that the font of this code matches the font of the other text in your document.
- Save and close the main report document.
- Open the main report document.
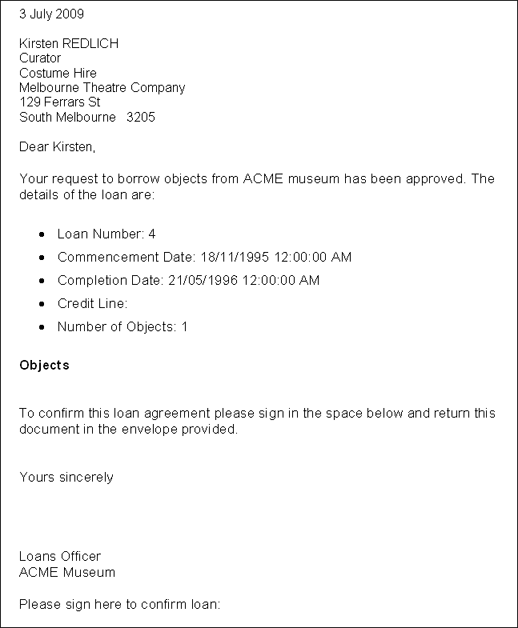
A new mail merge document is generated showing the address details:
Note: If, when you run the report, you find that the city and postcode are repeated (e.g. AdelaideAdelaide), check that at Step 12 you added another If...Then...Else statement and did not simply delete "false".
- At step 1. Write the VB code we modified the VB code for testing purposes by commenting out
MainDocument.Close SaveChanges:=False. Before we finalize the report we need to edit the VB code to remove the apostrophe.

